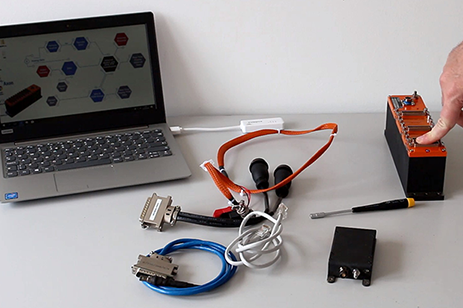
The Axon Quick Start Kit provides a basis for users to quickly become familiar with the Axon DAU and the Axonite remote DAU and the advantages and new features offered by Axon as a complementary system to their existing Curtiss-Wright data acquisition system, or as a standalone unit.
This quick start kit consists of fully qualified, released hardware and a laptop pre-configured with DAS Studio and TTCWare software, both supporting the Axon hardware in the quick-start kit. The quick-start kit may be expanded upon as future Axon user modules become available. This offer is limited to one per customer.
This video describes what’s included in the kit, how to connect everything, and shows you how to exchange modules between the Axon chassis and the Axonite.
Video Transcript
This is an introduction to the Axon Quick Start Kit (QSK) and has an explanation about what you get in the box and how you connect everything up to get it working. This is the one-pager pamphlet explaining what’s in the box. You get your 9 user slot Axon chassis which has your BCU, ABM/401 (a 24 channel parser packetizer for ARINC 429), your Axon ADC/401 (that’s your 8 channel flexible analog module), your Axon EXT/401 (that’s the extender to Axonite card). You get a 1 user slot AXN/ITE/01U Axonite chassis. You get a laptop pre-configured with DAS Studio and TTCWare and with an extensive user guide.
You also get:
- A module removal tool
- An Axonite extender to Axonite cable
- An RJ45 cable to connect the BCU to the laptop
- BCU to RJ45 Connector cable
- Two connector pins for creating your own cables to the ABM and ADC
- A power supply cable for the Axon
- A power cable for the laptop
- USB to RJ45 adapter for the laptop
- A universal power adapter
Now that we’ve removed everything from the quick-start kit, I’m going to go through how you connect everything up. The Axon BCU at this end of the chassis is a dual gigabit Ethernet controller for the Axon chassis. This cable goes on here. The power cable goes on the power supply. The RJ45 cable goes onto either of the BCU connections and connects to the laptop.
You take one of the user modules out of the Axon chassis and connect it to the AXN/ITE/01U using the extender cable. The first thing you need to do is make sure you power off the Axon chassis. Then you use the removal tool to remove one of the modules. Lift the module out of the chassis and place it in the Axonite and secure the module. Again, before you connect the Axonite extender cable, make sure the power is off, once it is connected – power on the Axon chassis again.
To remove the module from the Axonite and put it back in the Axon chassis, the first thing to do is power off the chassis – you’ll see the LED goes out. Then you disconnect the Axonite cable and with the module removal tool, loosen the screws. When the mounting bolts are loosened properly, they will be loose and you can then grip the two of them and pull the module out.
To insert the Axon module back into the Axon chassis, first of all again make sure the power is off. Then make sure the rails are on either side of the mounting hole and just push the module down into place and then screw down the bolts with the tool. The Laptop supplied with the Axon Quick Start Kit is preconfigured with DAS Studio and TTCWare for configuring your quick start hardware. To log in, there is an account created called Axon and the password is QuickStartKit.